This documentation is broadly divided into sections for:
- Data Providers - organisations who upload video and provide data to their clients
- Enumeration Providers - organisations who watch video and extract data for their clients
For Data Providers
If you record videos, or have to extract data from them for your clients, you are considered a data provider in our system. A example of such an organisation is a traffic data collection company.
Quick Start Guide
If you are very familiar with browser-based interfaces, you may find this short summary useful.
To setup your first enumeration task, sign in to your account and from the main menu screen, click 'Data Provider Interface', which takes you to where all your projects will be displayed, once you have set them up.
Click 'New Video Project' and add any information you require to make the project easy to recognise later. It will then be shown in the list, and clicking 'Tasks' takes you to where the list of tasks for this project will be displayed.
Click 'Upload Video' and you can see how much storage space you have used, and can choose more video files to upload. Click the 'Add File' button, and select the video you wish to make into a task, then click 'Start Upload'.
Once the file has been uploaded, and is shown as complete, you can see it in the main task list by clicking on the project name in the navigation bar at the top. Initially it may be shown with a video status of 'Queued' or 'Processing', but in less than a minute, it should say 'Ready' if you refresh the page by pressing F5.
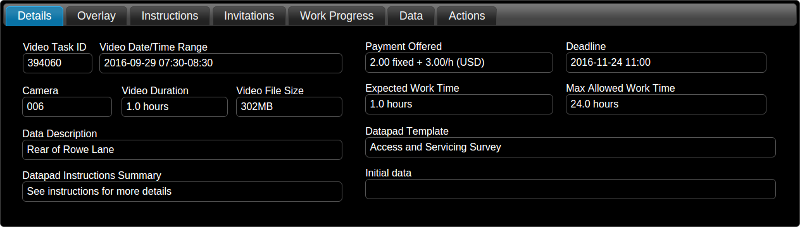
Selecting the task from the list shows it's details below, and many of these can be edited by clicking on the fields themselves, the most important ones are:
- Video Date/Time Range - as it sounds, tell the system when the video started and finished
- Data Description - this is included in the data, so use a recognisable label for the data
- Payment Offered - you can can fixed and hourly pay offers for the tasks, and the currency
- Deadline - the date/time the enumerator provider agrees to submit the data by when accepting a task
- Expected Work Time - an indication for the enumeration provider before they take accept a task
- Max Allowed Work Time - this acts as an additional deadline for the enumeration provider
- Datapad Template - defines what data is being recorded and the controls/keys used to do it
- Initial Data - for use if another source of data is being added to or corrected
There are several other tabs which allow different aspects of the task to be customised:
- Overlay - allows you to add labels and lines to the video to help the enumerator
- Instructions - these are shown below the video during enumeration to help the enumerator
- Invitations - this is where you choose which enumeration providers are offered the video tasks
- Work Progress - once enumeration has started, this shown some details about its progress
- Data - for viewing/downloading the data once the enumeration provider has submitted it
- Actions - basic facilities to clone and delete tasks, and delete video to free up storage space
How Much Video Storage Space Do You Need?
We currently provide only fixed capacity storage plans. You pay per month for having a certain amount of storage space. You can upgrade this at any time, and downgrade at the end of the month you have paid for.
The amount of storage you'll need for video depends on the several factors, as explained below.
Work Quantity and Schedule
The more video hours you need to extract data from, the more storage you generally require.
The pattern of your work also affects things though. If your workload is spread well over time, you can utilise more of your storage space than if you occasionally have large projects which are subject to short timescales. In order to have the capacity to deal with sudden high workloads, you may need to arrange more storage space than is ideal. In the future, we hope to charge by how much space is used on a daily basis which makes variable work patterns more affordable.
Video Bitrate
Most video cameras allow you to adjust quality settings, and this changes the bitrate of the video. The higher the quality, the more storage space it takes to store each hour of video.
This platform is designed for working with bitrates between 50Kbps and 2000Kbps. Whilst some ANPR (license plate) surveys may require high bitrates, we suggest that 500Kbps is usually sufficient for most traffic surveys, and you may find that even lower settings are fine.
One hour of video recorded at 500Kbps takes up 220MB.
One hour of video recorded at 1000Kbps takes up 440MB.
Some video uses a variable bitrate, which is also confusingly called Constant Rate Factor (CRF)!
This often provides better quality for the same file size, the but has the disadvantage that overall file sizes are less predictable. We recommend this if available though, because the bitrate used in any part of the video usually corresponds well to how quickly the data can be collected from it.
Depending on storage space in your cameras, you might find it useful to record at at higher quality, and then transcode (to compress) the video afterwards. There are various free tools for transcoding, and compressing your video can also mean that enumerators can play back the video at higher speeds for some tasks, and requires less bandwidth from their Internet connection. It also reduces your uploading time.
Work Throughput
If you're using a large team of enumerators, or offer very competitive payment, you can expect your work to be completed quicker than if you have a small team, or low budget. If your work is completed quicker it may mean you can download your data, and remove the videos within hours of uploading them. This lowers your storage requirements.
Of course, if you need to keep the videos around for reviewing against the data for a longer period you lose most of this advantage.
Some video tasks require a lot of work to extract the required data, whereas others are very quick. The nature of the tasks has a great impact on your storage needs.
Signing Up for the Platform
We currently do this manually, so please contact us.
Assuming you require between 10GB and 1000GB of video storage space, we can set things up within a few hours, and provide limited telephone support at no extra cost to help you get going if required.
If you require more then 1TB of storage space we can certainly scale our systems, but it may take a couple of days to prepare your account.
Signing In to your Account
You will have been supplied with a username and password though a welcome email. We suggest that you change your password to one which you'll remember by clicking the 'Change Password' button in the main menu.
Click 'Data Provider' to go to the main part of the interface. You can return to this main menu
page by clicking the  icon in the navigation bar at
the top of most other pages.
icon in the navigation bar at
the top of most other pages.
Starting a New Project
Before you can upload any video, you need to create a project to contain your video tasks.

From the list of projects within your account, when you click 'New Video Project', you will be asked to provide some details about the project. This information is optional, but may help you to identify your projects once you have many of them in your account. The name field is important as this is used in the top navigation bar for moving between different parts of the system.
You can use the search box, to search across any of this information, and can change it by clicking the 'Edit' button beside the relevant project.
After setting up a project you can click 'Tasks' to see the list of video tasks for the project - initially empty.
Uploading Video
Your account allows you to upload and store MP4 video on our servers. The amount of video you can store depends on the plan you chose when signing up for the platform. If you find you are running low on space, you can delete some of your existing video, or contact us to upgrade your plan.
Video uploads are carried out from within a specific project, so if you haven't set up a project yet, you will need to do this first.
Click the 'Upload Video' button in the top-right corner of the page, and you will be taken to a page where you can see how much storage space you have used, and how much you have remaining. From this page you can click the 'Add Files' button to select one (or multiple) video files to upload.
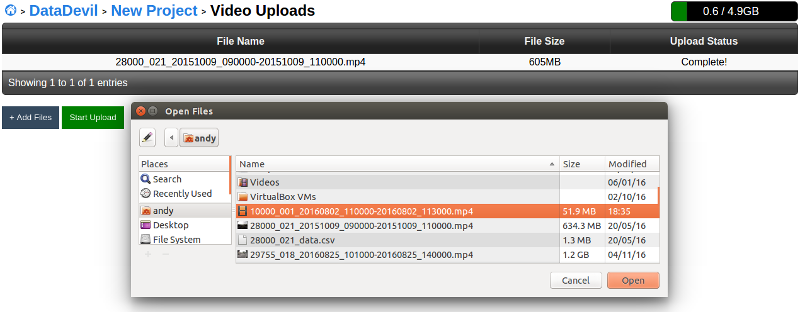
Each video file uploaded is turned into a new video task, so if you wish to make only one task from multiple videos, you will currently need to combine them on your PC first using a video processing tool.
If the files are given names in the form shown below, the software will automatically set the video start and end times, and camera numbers:
- 10100_001_20160929_073000-20160929_103000.mp4
- 10100_006_20160929_073000-20160929_103000.mp4
10100 is ignored, but might be the reference number for your job.
001 and 006 are two camera numbers, perhaps recording at different locations
20160929 is the date the recording took place
073000 is the start time for the videos
103000 is the end time for the videos
Your video must be of MP4 format, and no less than 5 frames per second. If your video has a very high bitrate (very good quality), it may limit how fast enumerators can record the data from the video, because they may not be able to download it fast enough to playback at high-speed.
If you need to, you can use a video processing tool before uploading your video.
When you click 'Start Upload' the files will be transferred from your PC to our servers.
How long this takes depends on how much video you are transferring, the bitrate, and your Internet connection speed, but you will need to leave the web-page open until all transfers are complete. progress is shown for each file.
After uploading each file, it is converted into a format that our system can use, and this can take up to a couple of minutes for a large file. After this, when you return to the task list for your project, you will see the additional tasks, and the video status should say 'Ready'. If it still says 'Queued' or 'Processing' you may have to wait a little longer before configuring the task. Press F5 to refresh the list.
Project Task List
This shows a list of tasks which belong to the project you are currently viewing.

The following columns are shown in the list:
- Start Date - the date on which recording started
- Video Range - the times that the video covers
- Camera - if you chose to identify your cameras, this shows that information
- Description - a label telling you what data was recorded in this video
- Payment - show the payment that will be offered for the task
- Video Status - shows whether the video is 'Ready' for use, or deleted etc.
- Task Status - shows the progress of work on this task, if it has been offered
You can search across any of the data fields which are shown in the list, and as you type the tasks are filtered to only those matching your search. This can be useful for large projects with many tasks.
Task Details Tab
This shows the basic information that relates to a video task. If more than once task is selected, the interface attempts to combine them where possible. This makes it quick to setup multiple tasks at once. You can for example, set the selected tasks to have the same payment offer, or the same datapad template.
Video ID
This is useful for idenfifying a task when discussing work with other people. Enumeration providers can see this number, and can refer to it if these are any problems with the work. You can also search in the 'Project Task List' using this code. This is added automatically and cannot be edited.
Video Date/Time Range
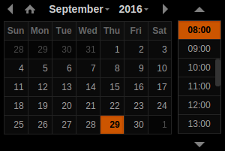
Shows the dates and times that the video starts and ends. If you uploaded a file with a supported filename, this will be added automatically. You can edit it by clicking the field, and either type the dates/times or select them using the date picker - shown below.
Camera ID
Many organisations like to identify their cameras by number of name, this is simply a field for doing this. If you uploaded a file with a supported filename, this will be added automatically, and can be edited by clicking on it.
Video Duration
This is calculated automatically when the file is uploaded and cannot be edited. It can be useful as a check that video conversion worked as expected.
Video File Size
This is calculated automatically when the file is uploaded and cannot be edited. It is useful for seeing which tasks are using most storage in case you need to make more room by deleting some videos.
Data Description
This is a label which helps you to identify your data. Enumeration providers do not see this field, but once the data is submitted, you can add this into it when you download. If you wish to download the data from many tasks at once, this is very useful.
You might choose names such as: Car Park 1 Exit or Junction 3 or Lancaster Mall.
Click on the field if you wish to edit the field before the video task is processed.
Datapad Instructions Summary
This shows a summary of the instructions that have been added to the video task. It cannot be edited directly, but shows the title of the main instructions page. This is added from the Instructions Tab. This field is visible to enumeration providers to help them decide whether they wish to accept the task. They can also see the full instructions.
Payment Offered
You can click this field to set the amount of money you wish to offer for enumeration providers to complete the selected task (or tasks).
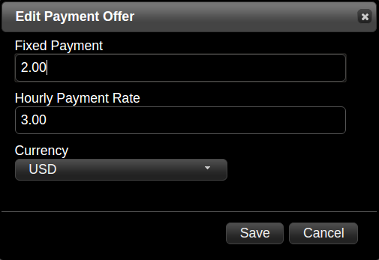
You can offer fixed or hourly payments, or a combination of the two, and choose your preferred currency.
When using hourly payments, the work time is calculated by our software, using an undisclosed formula. This works very well for many tasks, but there are some it is less suitable for such as those where the enumerator must watch through large amounts of video between recording events.
Please contact us for further advice.
Deadline
This is the latest time at which enumeration providers should submit the work they have agreed to complete. It is up to you whether you accept work delivered after this, but they are agreeing to provide the data by this date/time when they accept tasks. You can set it by clicking the field and using the date/time picker.
In practice when a task is accepted by an enumeration provider, the deadline they are set for a task is also effected by the Max Allowed Work Time if that would make it earlier.
Expected Work Time
This can be edited to give the enumeration provider an idea how long the task is expected to take them whilst they are working. Please enter a time in hours, for example 0.5 is 30 minutes. This is optional, and most useful for tasks with fixed payments.
Please be careful in using this with tasks offering fixed payments. If your enumeration providers end up having to do much more work than expected, they may not want to complete other offered tasks in future.
Max Allowed Work Time
This field may be used to further constrain the deadline which your enumerators must adhere to. If for example you enter 2 hours here, then even if the task deadline is a week away, the enumeration provider will see the deadline as just 2 hours away.
Our clients use this to ensure tasks are returned quickly, and not all just before the deadline!
Datapad Template
Clicking on this field allows you to choose which data is collected, and the controls to be used.
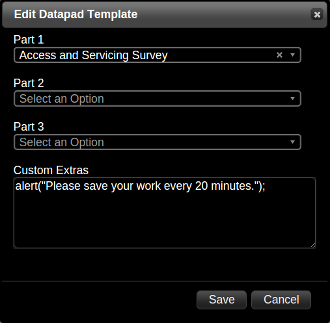
There are several predefined templates which can be simply selected from the list and used very easily. These mainly relate to traffic data collection as this is our primary focus at the moment.
Unless you have understood or discussed the more advanced aspects of the datapad template system, please only select a template for 'Part 1'.
You may define your own datapad templates with some fairly easy programming. We expect most clients will want us to help with this part though.
If you send us your requirements we can often add templates without any extra charge.
Initial Data
For some work, you may wish to add more information to existing datasets.
Clicking here allows you to select a CSV file, whose event data will be shown when the enumeration starts.
The file format used must exactly match the chosen datapad template, or there will be big problems, so this facility should generally only be used by more advanced users.
If you have already collected some data from a previous enumeration task, and you wish to collect additional information from the same video, you can choose to 'Download Raw Data' from the Data Tab, clone the task from the Actions Tab, and upload the CSV file using this field.
Again, please be careful in using this advanced facility, as there are currently no checks to ensure the uploaded data is compatible with the selected datapad template.
The file format looks as follows
[Event Stream ID], [Time Offset in Seconds], [Data Field 1], [Data Field 2], ...You can see what a file looks like by downloading some raw data once you have some, or contact us.
Task Overlay Tab
This allows you to add labels, lines, arrows and other shapes to the video to help the enumeration process.
You are shown a preview of the selected video task, which consists of several 3 second sections of video joined together to make a loop. This is also available to enumeration providers to help them decide whether to accept a task.
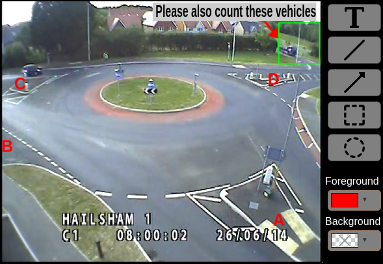
Clicking 'Edit' shows the various drawing tools, which can be used (as above).
To add green text with a black background to the image, you would first select the foreground colour, and then the background colour, and then click the 'T' icon. Initially a '#' is shown as a placeholder, and typing adds text over the top of the preview video. When you click off the text, you are able to drag, resize and rotate it as needed. The same principle applies to the other tools.
You always select the colours before clicking the tool, and can choose semi-transparent colors too, which can be useful for tinting specific areas, which you can then refer to in the instructions.
Once you are happy with the overlay, click 'Save'.
Preview Datapad
Clicking 'Preview Datapad' at the right-hand side of the overlay tab opens the full datapad interface which the enumerator will use to do the data collection, the overlay should be visible as you intended it.
When in preview mode, you can play through the video, test the control keys and record events, but these will not be saved.
We advise once you have also added instructions to your tasks, that you briefly check them like this before inviting enumeration providers to work on them.
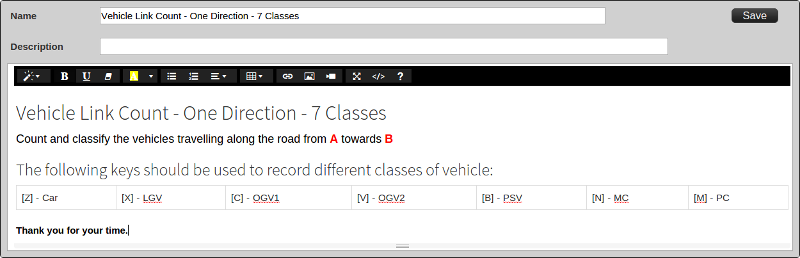
Task Instructions Tab
You can use this tab to choose/define the instructions you wish the enumerator to see whilst they are working on the data collection task. They are displayed beneath the video itself for convenience.
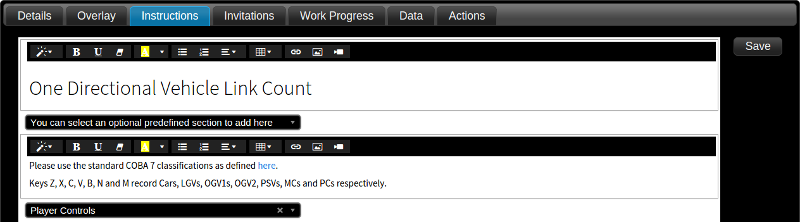
The title you use is important because this is shown in the task list that the enumeration providers see when selecting a task to work on, and helps them decide whether or not they would like to do it. To ensure it appears properly, please make sure the the first line's style is 'Header 1' or 'Header 2'.
You can choose up to three predefined instructions templates, and we have provided a few of these for common traffic data collection tasks.
As with datapad templates, you can also define your own instructions templates. This is quite easy, but if you are very familiar with online interfaces such as Wordpress, you will have an advantage.
In between predefined sections you can add custom parts which relate specifically to the selected task(s).
You might for example just want to say:
Please ignore all traffic coming from the car park exit....or you could need a much larger section of content.
You can include images (by copy/pasting them into the instructions editor), different text formatting and tables.
Task Invitations Tab

From here you can offer the selected tasks to enumeration providers you have relationships with.
Clicking in the large empty section opens a dialog box where you can search for, and choose one or several enumeration providers, and they will be notified about the work when you 'Publish' the tasks. If the tasks have already been published, they will receive notification straight-away.
To publish the selected tasks, you click the 'Published' button, and confirm the action.
Once tasks are published, you cannot change many details without 'unpublishing'. So please check carefully, and use the preview facility in the overlay tab.
The email notifications consist of a simple message informing the enumeration providers that your organisation has published new tasks which they may be interested in, and a web link which takes them to the interface where they can review the work, and accept it if they would like to.
Task Work Progress Tab
Once a task, or tasks, have been published, this tab shows information about what is currently happening with the selected task(s).

It shows:
- Which Enumeration Provider is working on the task
- The name of the individual enumerator (if available)
- The deadline by which time the enumeration provider agreed to submit the data
- The work status: Ongoing, Data Submitted, Data Approved - and the time of the last status.
- How long the enumeration provider is calculated to have taken on the work so far
- The calculated cost of the work so far, based on fixed payments plus any hourly agreed rate
If multiple tasks are selected, the calculated work time and calculated costs are added together and the total cost shown. Any fixed payment costs are added as soon as enumeration is underway.
Task Data Tab
Once a task, or tasks, have been submitted by enumeration providers, this is where you can access it.

The data for all selected tasks is combined (if it is of compatible types), and is presented as a flexible pivot chart, where you can drag data fields around do enable simple checks on the quality of the data.
We hope to add some video documentation soon to illustrate this better, but if you are familiar with pivot tables/charts in Microsoft Excel, you should get the hang of it.
When you want to download the data, you select (or deselect) the columns to include from the list on the left-hand side, and click one of the 'Download' buttons below.
If your datapad template definition defines the pivot table layout for Excel, you can download this directly, but you can always download the 'Event Data', and this can easily be used to make pivot tables anyway, and provides the greatest flexibility.
As well as being able to download your data, you can also view it alongside the video by clicking 'Review Datapad'. You are shown exactly the interface that the enumerator used to collect the data, but cannot change it from here. Moving through the video events is easy using the standard controls. This only works with one video task at a time.
Once you have checked the data, and are satisfied that the task has been carried out as requested, you can mark the selected video task(s) as approved, the enumeration provider sees this change and will know to expect payment for it when that is due.
If on reviewing the data you discover a problem, you can refer it back to the enumeration provider by clicking 'Request Review'. The enumeration provider is notified by email, and the task returns to their 'outstanding tasks' list. They should then check their work and resubmit the updated data.
Payment and dispute resolution are not currently handled by our system.
Task Actions Tab

Clone Video Task
Whether you need to repeat some video enumeration, want to carry out check counts, or need to extract several datasets from the same video, this command can help you.
It copies everything in the Details, Overlay and Instructions tabs, but doesn't add invitations, or publish the video task, even if the original was published. It doesn't copy the data either if data had been submitted for the original task.
Please note that in order to save storage space, when you clone a task, the video isn't actually copied, but the same video file may be used for several video tasks.
Delete Video Task
When you no longer need a video task, you can delete it using this function.
Note that if you delete a video task which shares a video file with another task, you may be surprised to see you free storage hasn't increased. Only when the last task using a video file is removed will the actual video file be deleted, and the storage space reclaimed.
Delete Video Only
If you wish the free storage space, but want to keep your data on the online interface, you can use this function to delete the video.
Please note that once done, you cannot view the data alongside the video anymore.
Defining Datapad Templates
In the main projects list, click 'Datapad Templates', and you will see a list of all those available to you. There are a number of general templates which we have defined for some standard traffic data collection tasks, but you can also define your own. Once defined they appear in your list, but are not available to other organisations.
Selecting one will show the definition code beneath. They are defined using the Javascript programming language, but we have made this easier by giving you some standard commands to use.
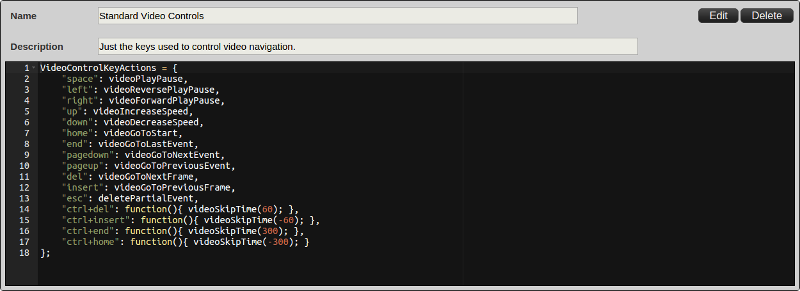
We hope to expand this section in future with further explanation about how to setup templates, but in the meantime, you can either learn from the code for other templates, or ask us to create some templates for you, which we are often happy to do without any additional charge.
Defining Instructions Templates
In the main projects list, click 'Instructions Templates', and you will see a list of all those available to you. There are a number of general templates which we have defined for some standard traffic data collection tasks, but you can also define your own. Once defined they appear in your list, but are not available to other organisations.
To create a new instructions template, you would click 'New Instructions Section'. They are called sections because the final instructions that the enumerators see may include up to 3 of these predefined sections, and 4 extra custom parts if required.
You will see an __unamed__ instructions section in the list, select it, and click 'Edit'. You can then enter a suitable name and description, and start working on the actual content.
The toolbar shown at the top of the the content editor allows you to adding styling, tables, colours and images. The interface is similar to other online editors such as that for Google Docs, though it is more basic.
When you have finished (or to be safe, during editing) you can click 'Save'. Your new template will now be available to choose when setting up new video tasks.
Enumeration Provider Manager
Before inviting enumeration providers to take video work, you must have an existing relationship.
In the main projects list, click 'Enumeration Providers', and you will see a list of all relationships you currently have in the system. You can manage these relationships and create new ones from here.
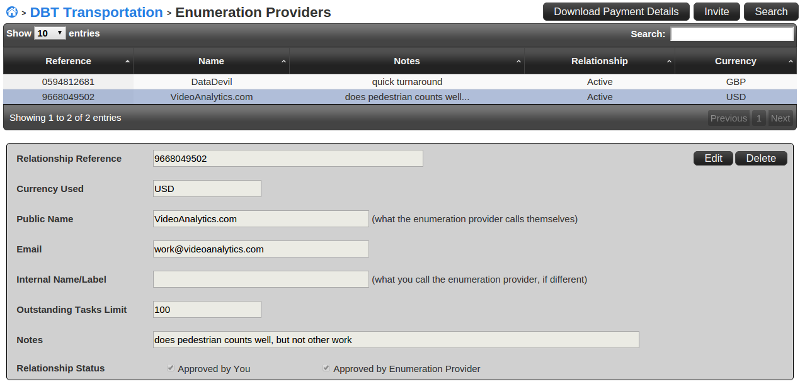
Clicking 'Edit' when viewing a record allow some fields to be edited, so you can for example dissaprove a relationship if there is a problem with data quality, or allow more video tasks to be accepted by some very trusted enumeration providers.
Clicking 'Invite' allows you to send email invitations to one or more people or organisations who you would like to carry out your video enumeration tasks. You also specify the currency you wish to use for payments.
Using the 'Download Payment Details' button, you can get a list of all tasks undertaken between specific dates to help you with your payment process.
Miscellaneous
What is event data?
Event data is how we describe the way all data is recorded on the Video Datapad platform.
Every observation from the video footage that you are interested in, is collected as an individual record with the following attributes:
- Which event stream the event belongs to Several streams can be defined which cover different aspects of the data.
- The time at which the event took place The offset from the start of the video, and the real-world time.
- All other data fields Different datapad templates define different data to be collected, and there can be many columns.
There are some important benefits to storing all events that are recorded rather than grouping count data during enumeration for example:
- You don't need to know so much about how you will use the data before you collect it You can group to many different time intervals, when you download and export the data.
- The data can be audited more easily for validity than grouped data By viewing the data alongside the video recording, you can readily spot many enumeration errors.
- There's more flexibility in what data can be collected Not all data is suited to numerical aggregation, descriptive comments for example need to be stored in their original format.
In the traffic data collection industry, ATCs (automated traffic counters) used to store only how many vehicles had passed over the tubes, but once storage was less of a constraint, manufacturers decided it was better to store the individual 'tube strikes', with accurate timestamps, so the way data was presented could be decided later. Since the storage of data is almost insignificant compared to the storage of video, we follow this philosophy throughout our systems.
Video Processing Tools
When using this platform, the costs are directly associated with how much storage space is required, so it can save some money if you compress it. Our system also only supports MP4 video, so if you have video in a different format, you will need to use a transcoding software to convert it.
The following video processing tools to allow you to change formats and reduce video sizes:
- Handbrake - a free, easy to use transcoder We generally suggest you use a Constant Rate Factor (CRF) quality setting of around 30, but this depends on the video task. Registration plate surveys, may need to be higher than this, but some vehicle link counts for example, could manage with lower.
For dealing with several video files at once, it is a good idea to create two folders one for the original (source) videos, and one for the converted (destination) videos.
- FFMpeg - an open source command line tool (for more advanced users) If you are happy to use command line tools, you are probably happy to experiment to find the best settings, but here are a couple below for you to try:
ffmpeg -i input.mp4 -c:v libx264 -preset fast -x264opts crf=32:keyint=50:min-keyint=50:scenecut=-1 output.mp4

ffmpeg -i input.mp4 -filter:v scale=w=iw/2:h=ih/2,fps="fps=8" -c:v libx264 -preset fast -x264opts crf=50:keyint=50:min-keyint=50:scenecut=-1 output.mp4
The latter command reduces the resolution and framerate of the video for great
compression. The quality is not good, but videos this small can be played back
at high-speed even over the Internet.
If you require an efficient transcoding pipeline for dealing with large amounts of video, we can discuss the options with you, and help you establish one that fits your organisations needs.
For Enumeration Providers
Video Introduction
Delegating Video Tasks
Contact Us
For all technical and sales enquiries please contact Andy Betsworth.
Address
DataDevil Limited8 Station Mews
Silloth
Cumbria
CA7 4AF